-
Get Cloud GPU Server - Register Now!
Toggle navigation

Consider the following statistics for a moment:
All the above figures testify to the growing popularity of videos as a marketing tool.
So, if you want to promote your brand more effectively in the digital world, video marketing is the key.
In this comprehensive, super-detailed guide on video marketing, we will discuss everything related to video marketing.
Here is the list of topics we will cover.
|
Table of Contents |
|
What is Video Marketing? Type of Marketing Videos How to Make a Video for your Business? How to Optimise your Videos for Search? How to Set Goals and Analyse the Performance of your Videos? |
Before anything else, let us understand what video marketing is.
Video marketing is the marketing strategy where you use videos to promote a brand, business or product.
Commonly employed platforms for video marketing include YouTube, Facebook, Snapchat, Instagram and Vimeo.
Brands are increasingly using videos to lure customers in every part of the marketing funnel. In fact, 45% of the marketers plan to add YouTube to their digital marketing strategy this year.
Before you conceptualise a video, you need to understand the different kinds of marketing videos that are out there. This will help you determine the kind of videos you want to create.
Let’s go through the list.
These videos showcase how your product works. You can either unbox and test a physical product to test or take viewers through a virtual tour of your software. You can emphasize the unique features of your offerings explaining how they will enhance user experience.
Here is a product demo video from Crayola LLC, an American handicraft company:
These videos tell the story of your brand including who you are and why you are passionate about serving your customers.
You can either introduce your brand and/or share your company’s vision and mission.
Through brand videos, you can create awareness around your brand and intrigue your target audience.
Below is a brand video from Toshiba:
These videos help your audience understand why they need your product/service. Explainer videos focus on the fictional journey of your prospects and show how they can solve their problem by adopting your solution.
Here is a short explainer video from Stitch Fix:
How-to videos teach your audience to do something, for instance, play a musical instrument, cook pasta or create an infographic.
For a lot of businesses, such videos are a part of their blog content. So, they are designed with an intent to engage the audience and not convert them there and then.
Here is a how-to video from Filmora:
Interviewing thought leaders in your industry is a proven tactic to forge a connection with your audience. You can either find experts within your organization or reach out to influencers within your industry.
Webinars are virtual seminars that can take the form of a panel discussion with industry experts, a prepared lecture or a live Q&A session. Though webinars are hosted live, it is a great idea to record them and post them on your website or YouTube.
These are customer success stories that make your brand appear authentic. You can interview your satisfied customers and demonstrate how your offering solved their problem.
Here is one such video:
Culture videos highlight your brand’s culture and personality for your prospective employees and customers. Through these videos, you can narrate the story of your brand: who are you as a brand and what you stand for.
Watch a culture video from Google:
These videos are customized for each individual user. This is done by inserting personal elements such as a user’s name or profile photo or job title directly into the video.
Video personalization platforms allow you to use the same videos over and over again; all you need to do is to place personalized elements into the points designated as fields in the video.
Creating a video entails a lot of work. In this section, we will elucidate the process of creating and publishing a video for your business. So, let’s begin.
Before anything else, decide why you are creating a video in the first place. Are you trying to improve brand awareness or increase sales? Or do you want people to download your e-book?
Without a clear purpose in mind, you may find yourself going haywire with the tedious process of videomaking. Plus, your videos may not be as effective.
There are a couple of things that must be clear in your mind before you start shooting a video:
Target Audience: Make sure you clearly define your target audience. This way, you will be able to tailor your message to meet the needs of your audience.
Goal: Which goals do you want to fulfil through your videos? Want to create awareness about a newly launched product? Want more people to sign up for your email? Everything boils down to what you want your audience to do after watching your video.
Platform: Where do you plan to publish the videos? Some of the platforms you can consider are Facebook, YouTube, Instagram, Twitter, Vimeo, Snapchat and your website.
Budget: An important aspect to consider is the budget and resources you have. Can you afford to hire a professional videographer? Have you set aside money for equipment, travel and video advertising? Do in-depth research to get a realistic assessment of your expenses.
Creative Requirements: You might face a lot of creative challenges while creating videos. You may not know how to create an animated video. Your editing skills may not be up-to-the-mark. How will you cope up with these challenges?
Key Performance Indicators (KPIs): Without a parameter to measure the success of your videos, you may not be able to assess their impact and improve your video marketing efforts. Choose KPIs that are sync with your video marketing goals.

Scripting your video is an easy way to ensure it turns out the way you want it to. Without a proper script, you may lose track of what you want to convey. Plus, you may find yourself doing more edits than are usually required.
To begin with, prepare an outline for your video. Once this is done, list down your key points and order them in a logical fashion.
Stick to the traditional approach to scriptwriting where you can put your script in a two-column table. Write your audio script in the left column and write matching visual ideas in the right column.
To make sure your audience understands the purpose of your video, include a hook in the very beginning that states the purpose of your video.
Also, make sure you grab your viewers’ attention within the first 5-10 seconds of the video. Steer clear of animated logos, long background stories or anything else that’s not compelling enough.
As far as the language of your videos is concerned, it should be simple and conversational. Avoid very long sentences and complex words or phrases. Avoid using jargons and buzzwords. As far as possible, write in the first person and use visual language.
When it comes to videos, keeping them short and sweet works most of the time. Use a script timer to convert the length of your script to the time it will take to read it. A script of around 400 words will be approximately 2 minutes long, so write accordingly.
Another important thing which we cannot emphasize enough is reading the script aloud. This way you will be able to smoothen the kinks and achieve the much-needed flow.
A professional-looking video needs the right set of equipment. Here are some of the things you will need:
a) Camera
When it comes to cameras, there are plenty of options to choose from. What we recommend is a professional DSLR camera that is both economical and easy-to-use. DSLRs give you a lot of control over the settings of your camera.
However, if you are new to photography, you may require some training before you start shooting.
Among the pocket-friendly DSLR options are Canon EOS 7D Mark II, Canon EOS Rebel T6, Canon 80D and Nikon d3300.
If you intend to shoot videos with lots of motion, GoPro can be a great option.
b) Tripod
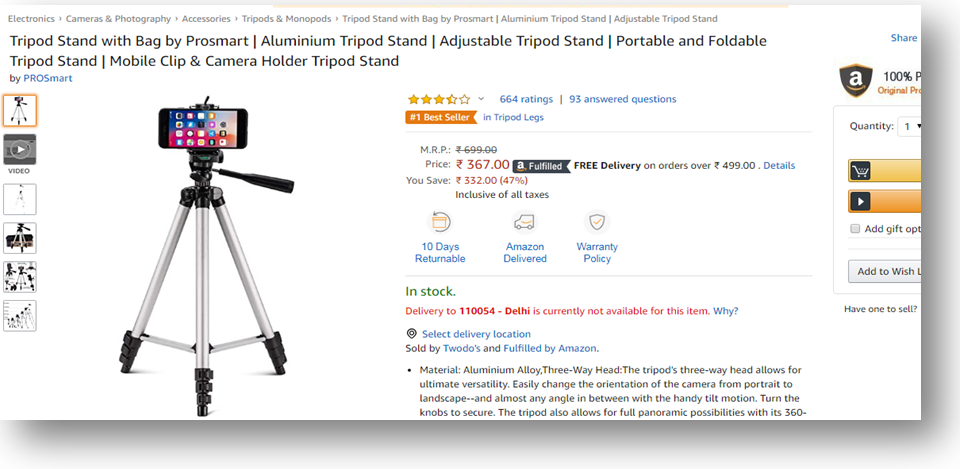
Tripod is a must-have for those who want their videos to look neat and professional. These days most of the DSLRs come with a free tripod. If your DSLR set lacks one, you can buy a cheap tripod online.
Here’s a tripod from Amazon that costs just 367 INR:

c) Microphone
Although most of the DSLRs have a built-in microphone, it’s best not to use them. If you want your videos to sound great, buy an external microphone.
You can either buy a lavalier microphone or a shotgun microphone.

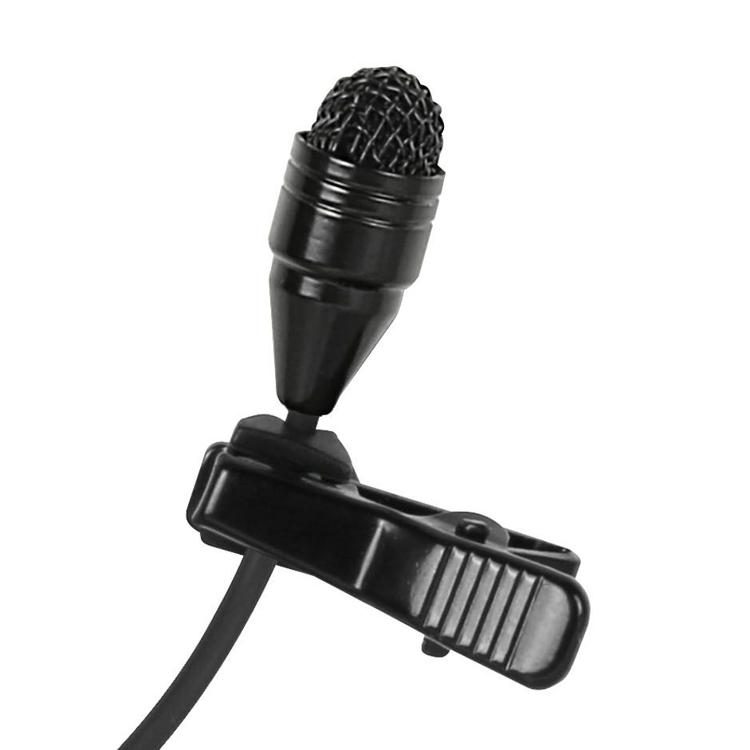
A lavalier microphone; Image Courtesy: Sweetwater.com
A lavalier microphone can be easily clipped to the subject’s shirt. Because they remain close to the subject’s mouth, the audio sounds great. The drawback of a lavalier is that if you try to hide it under your shirt or clothing, it will produce muffled sound.
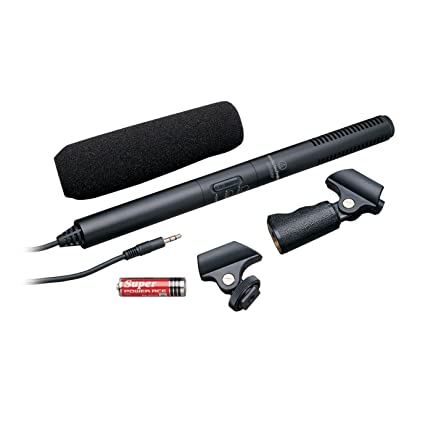
If you are recording the video in a controlled environment, shotgun microphones are a great option. They aren’t visible to the viewer and record background noise in a natural-sounding way.
If you are creating a shotgun mic set-up in your studio, you will have to buy some accessories in addition to the mic: light stand, shotgun clip, XLR cable and Zoom recorder. Now, this may sound like a lot of investment. But a shotgun setup once purchased lasts for years.

A Shotgun microphone; Image Courtesy: Amazon
d) Lighting
For creating a conventional three-point lighting setup, you will need three light stands, extension cords and a few clamp lights with bulbs.
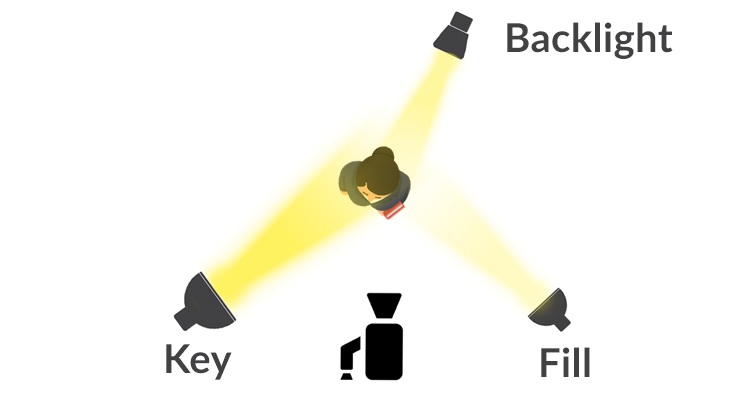
In a three-point setup, three lights are strategically placed around your subject in order to create the overall quality of the footage.
Here’s what a three-point set-up looks like:

Out of the three lights, the key light is placed at a 45-degree angle to the left or right of the main subject. The fill light is placed at a 45-degree angle on the other side of the key light and used to fill shadows created by the key light. The third light, back light placed behind the subject lights it from the rear.
Once you gathered all the equipment, it’s time to build your studio. With a designated studio to shoot in, you can save a lot of preparation time. What’s important to remember is that the room you are shooting in should not be too empty; else the voice of the subject will echo.
Make sure the room has minimal noise. If you have an air conditioner switched on during shooting, it shouldn’t make too much noise. Keep the fan switched off while recording. You can consider using a photography paper for creating an appealing background for your studio.
Turn off the overhead lights if any; with a three-point lighting set up you will not need any overheads. Also, clear out unnecessary people from the room.
Once you have set up the studio, it’s time to start recording the video. To get the most out of your script, break it into small sections and record one section at a time. You can even record each section a couple of times and choose the best shot for your video.
It’s important to plan the shoot well in advance so that your subject gets plenty to time to go through it. But he doesn’t need to memorise all the lines. He can read it directly off the laptop while shooting.
After you are done with shooting the video, the next big task that lies ahead is editing. When it comes to choosing a video editing software, there are a lot of good options available in the market. You can choose a software depending upon your skill level, budget and operating system.
iMovie: iMovie is a video-editing software developed by Apple. It is user-friendly and free on Apple products. Using the software, you can crop video clips, modify colour settings, stabilize shakiness in videos, add transitions/special effects and speed up and down your clips.
You can also simplify the editing process using templates. You can even share your work on a video hosting platform such as YouTube. iMovie can be a great option if you are starting out.
Adobe Premiere Pro: Adobe Premiere Pro is a popular video-editing software used by both amateurs and professionals. The software comes with advanced colour correction and grading tools not available with cheaper options like iMovie. It can be easily synced with other Adobe programs such as Photoshop.
With Premiere Pro at your disposal, collaborating with other editors or organizing your material is a breeze.
That said, the program isn’t budget-friendly. So, if you are new to video editing, you may prefer experimenting with cheaper options like iMovie before switching to Premiere Pro.
Once have finalised your editing software, let’s take a look at a few things you can do to your video to make it look amazing.
Music: Choosing a suitable piece of music for your video may appear to be a daunting task, but if done right it can enhance the mood and tone of your video to a great degree. Music can capture your viewer’s attention, evoke emotions and make your video appear super-professional.
What you need to remember here is that most of the music isn’t free. If you use an artist’s work without permission, you risk legal action. So, if you want to stay away from copyright infringement, use royalty-free tunes that are easily available on sites such as YouTube and PremiumBeat.
But royalty-free doesn’t mean the music is free-of-cost. It means you just have to pay a flat fee and not worry about paying licensing fees or royalty.
Also, consider the purpose of the music. If you will be narrating or speaking throughout the video, don’t let music get in the way of your content. In case you don’t need music throughout the content, play a track just at the beginning and the end of your video.
To get a better understanding of the music aspect, watch similar videos to analyse how others incorporate music in their projects.
Voice-Over: Once you are done with music, it’s time to record your voice-over. A voice-over is a narration not spoken by the speaker on camera. Voice-overs can make your projects more relatable.
For recording a voice-over, the very first thing you need to do is to find a suitable spot free from distracting sounds. But do not start recording right away. Read your script and pay attention of the acoustics of the room. If you find your voice echoes or sounds muffled, fill the room with furniture or consider another place for recording.
Before you start recording, read the script a couple of times and notice all pauses and transitions. While recording, use either a laptop or a teleprompter to ensure you don’t have to go through a printed script. Make sure you read slowly and take adequate breaks.
In addition to adding music and voice-over into your video project, add colour correction and graphics and animations if the need be.
Once you are done with recording and editing the video, it’s time to publish it online so that your audience can start engaging with it.
Out of the several video hosting platforms available today, the most popular is YouTube.
There are many reasons for choosing YouTube to host your video: it is the third most visited website in the world, the second largest search platform after Google. Plus, it allows you to upload videos for free and optimise them for search.
YouTube allows you to host videos on individual channels, so you can build a dedicated audience of subscribers. And within your channel, you can organise videos into playlists so it’s easy for your audience to search for anything specific if they want to.
Besides, if you want to go for more sophisticated targeting, you can choose YouTube advertising.
In addition to video hosting platforms, you can publish your video on other places on the web:
Merely publishing a video isn’t enough. Unless your video is discoverable, people won’t engage with it as much as you want them to. So, you will need to optimise your video for search.
Here are a few things you can do:
Carry out exhaustive keyword research to discover keywords people are actually searching for. Create a compelling title and description for your video and insert these keywords naturally in your title and description.
Title: Keep your title at least 5 words long and place your keywords at the beginning of the title.
Description: As far as the description is concerned, keep it at least 250 words long and insert keywords in the first 25 words; include keywords at least 2-4 times in the description.
Video transcript is the text that pairs with your video. Transcripts make your content more discoverable by search engine bots because they add more text to the page.
A video thumbnail is the main image a searcher sees when your video gets indexed. Unless your thumbnail is compelling and relevant, they may not click on and play your video.
While you can always choose any of the thumbnail options auto-generated on YouTube, it is recommended to upload a customised thumbnail.
For YouTube thumbnails, you can choose images that are 1280 pixels wide and 720 pixels tall. The image should be in .jpg, .gif, .png or .bmp formats and shouldn’t be more than 2 MB in size.
You cannot rely solely on video optimisation to rank your video content in search engine rankings. If your page isn’t properly optimised for the right keywords, search engines will not crawl it. So, make sure you post high-quality content on your page and take care of the technical aspects of the SEO.
Plus, the video should be relevant to the page you are publishing it on. If the page is about online marketing and you throw a recipe video on it, chances of your video getting ranked are dim.
By creating a category for your video, you can group it with similar videos on YouTube and make sure it appears in different playlists and gets exposed to a wider audience. ‘Advanced Settings’ on YouTube allow you to place your video in the desired category.
As discussed above, before taking the plunge into video marketing, you need to define your video goals and identify the metrics aka key performance indicators (KPIs) to determine whether you have accomplished these goals.
Now, your goal could be to increase brand awareness, boost audience engagement or enhance sign-ups for a newsletter. Whatever be the case, you should not pick more than 1 or 2 goals at a time.
When deciding your goals, keep in mind your target audience: What is your buyer persona like? What age group do they belong to? Where do they live? What are their interests? How do they consume media? What stage of the buyer’s journey they are in?
These questions will help you determine what kind of video you should make.
For instance, if your target audience isn’t familiar with your brand, you should first create videos that explain what your brand is all about, what are its core values. You can then proceed to make explainer or demo videos.
Coming to metrics or KPIs, there are some important metrics that you need to know in order to set your goals and track the success of your goals. These metrics are as follows:
View Count: View Count is the number of times your video has been viewed. This is a crucial metric for those who want to improve brand awareness.
Watch Time: It is the total time viewers spent watching your video. Remember, YouTube takes into account watch time while ranking videos for search. Weaving a compelling story in your video can improve your watch time.
Video Completions: It is the number of times the video was played in its entirety i.e. from the beginning till the end. It is a vital metric to track how engaging your video is.
Completion Rate: It is the ratio of the number of people who completed your video divided by the number of people who played it. If your completion rate is below par, it’s an indication that your content isn’t compelling enough to keep the viewer engaged till the end.
Click-Through Rate: This metric indicates how well your video encourages viewers to take a desired action. CTR is the number of times your call-to-action is clicked divided by the number of times it’s viewed. In case your CTR is low, you can consider changing the placement of your call-to-action in the video.
Conversion Rate: It is the number of times your audience took a desired action divided by the number of clicks your CTA received. If your goal is to make the audience take a desired action, consider adding a video to your landing page.
Social Sharing and Comments: These metrics indicate how relevant your content is for your target audience. If a viewer takes time to comment on your video or share with their network, it indicates you have created high-quality content. The more a video gets shared, the more it gets watched. So, a higher number of shares indicates a wider reach.
|
Video KPIs you need to Track View Count Watch Time Video Completions Completion Rate Click-Through Rate Conversion Rate Social Sharing and Comments |
If your videos are not yielding the desired results, it’s probably the time to analyse the shortcomings in your video marketing strategy. You may not be catering to the right target audience. Or, our content may not be compelling enough to keep the viewers engaged for a long time. Or, probably your audience cannot find your videos because they aren’t properly optimized.
Dig deep and identify the reasons behind your video content not giving the desired ROI.
Remember: To make the most of video marketing, you should keep video goals that are aligned with the larger strategy and KPIs of your business.
For those of you who are new to video marketing, creating, publishing, promoting and analysing videos may appear intimidating at first. But once you get the hang of it, you can easily produce high-quality video content that’s well-aligned with the goals of your business.
Enjoyed reading the guide? Leave your comments in the section below.
Good read! Very helpful for marketers